These days, static site generators are a much-used tool for building websites that can then be served by S3 or Google Cloud Storage. This is a good idea because static websites are fast and cheap. But because of their static nature of static sites, deploying them is a pretty manual process.
So let’s automate it using a couple of freely available tools: You can use Hugo to generate the site, Google’s Firebase will host it for you (for free if you’re on the Spark plan, and you get Let’s Encrypt TLS certificates out of the box), and you can use Gitlab CI to deploy it automatically. This takes some time to set up but it works great.
End result
When we’re done, we will have a static website generated by Hugo running on Firebase Hosting. HTTPS, which should be enabled everywhere (even on static sites), will be configured for the domain the site is running on. As an optional follow-up step, you can connect a custom domain to the Firebase site.
Prerequisites
To be able to follow along, there are a few things you need. Go get them if you don’t have them yet.
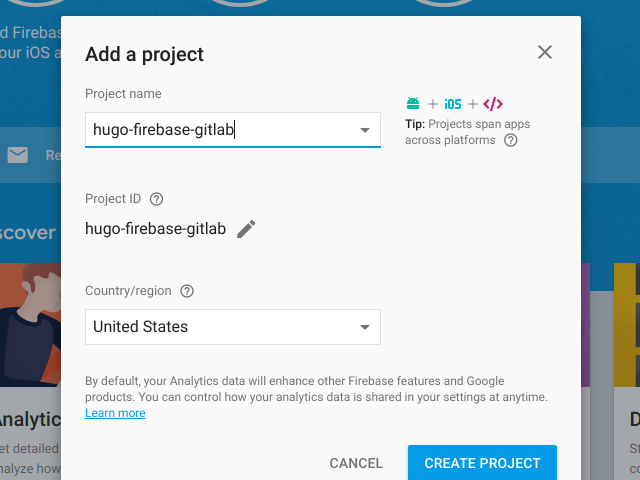
A Firebase account and project
Since your website will be hosted by Firebase Hosting, you will need an account (the free plan is enough). Once you have an account, go to the console and create a project. Note the name of the project, I will refer to it with <project-name> from now on.
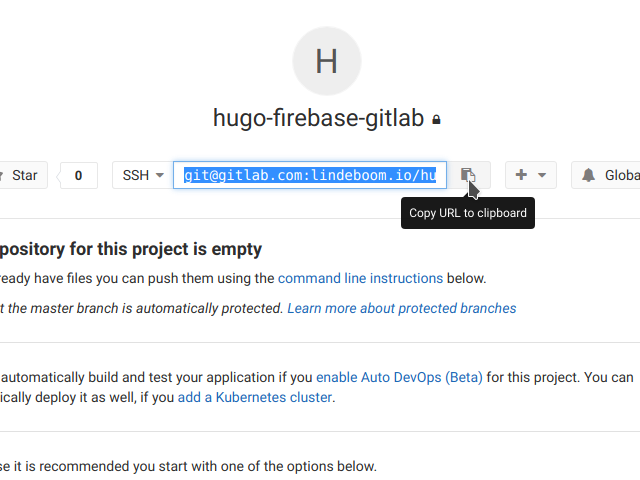
A Gitlab.com account and project
For managing the source code of your static site, and building and deploying it, you need to create a Gitlab.com account. Once you have an account, create a new (private) project. Decide if you want to use HTTPS or SSH (you will need to add an SSH key to Gitlab in the general Gitlab settings) and note the repository URL.
Git and Hugo installed on your system
Most operating systems will have Git installed by default, but if you don’t have the git command, install it using the instructions here.
If you don’t have Hugo installed yet, do it now based on the instructions found here.
Your first Hugo site
The process of creating sites with Hugo is out of scope for this article. To keep us moving, we’re going to use a kickstart provided by the makers of the Academic theme. To grab it, go to the directory where you store your projects and clone the repository:
git clone --recursive \
    https://github.com/sourcethemes/academic-kickstart.git \
    <project-name> && \
    cd <project-name>
You now have a local copy of the kickstarter, let’s check if it compiles by running the following and looking for Lena Smith’s Biography at http://localhost:1313:
hugo serverNow that you have verified that your Hugo site is OK, let’s generate the HTML before deploying it to Firebase. You want to give it the proper base URL for links to work. For this, you need the URL of your Firebase project, which will be <project-name>.firebaseapp.com. You can also go to the Hosting section in the Firebase console to get it. Now compile the site, Hugo will put the HTML in public:
hugo --baseURL https://<project-name>.firebaseapp.comDeploying to Firebase
Your site’s HTML is now ready to be deployed, but you need to tell Firebase what to do with your project first.
Log in with firebase login and generate the Firebase config using the CLI tool. Select the project you created and press enter on the following prompts:
firebase init hostingYou are now ready to deploy:
firebase deployIf all went well, you are now able to ac=cess your site at https://<project-name>.firebaseapp.com.
Deploying automatically with Gitlab
For Gitlab CI to be able to deploy to Firebase, you need to give it an OAuth token. You can get a token by asking Firebase to generate one:
firebase login:ciAs a rule of thumb, NEVER put any unencrypted credentials in source controlled configuration files. To facilitate not having to do this, Gitlab CI allows you to enter secrets in its control panel so that they are available as variables in the pipeline. To do this, navigate to the Gitlab project settings (the menu to the left), go to the CI/CD section of the project settings and expand the ‘Secret variables’ pane. Create a secret with FIREBASE_TOKEN as the key and the token as the value.
Next, you add a configuration file called .gitlab-ci.yml to the project root. Gitlab CI needs this to build your site:
image: lindeboomio/hugo-firebase-gitlab-builder

variables:
  SITE_URL: https://<project-name>.firebaseapp.com

stages:
- deploy

Deploy:
  stage: deploy
  script:
  - hugo --baseURL $SITE_URL
  - firebase deploy --token $FIREBASE_TOKEN
  only:
  - master
Note the image setting? This indicates the Docker image that Gitlab CI uses to build your project. This particular image contains Hugo, the Firebase CLI and a number of tools we’re going to use in a later article for testing our site. Check it out on Docker Hub.
Now let’s push everything to Gitlab so that it can start deploying your site. Because your Hugo site originates from a cloned Git repository, you can just change the remote to the URL of your Gitlab repository:
git remote set-url origin git@gitlab.com:<username>/<project-name>.git
git commit -a -m "Firebase and Gitlab CI configuration"
git push
Gitlab CI will now pick up the .gitlab-ci.yml file, but you may need to trigger the first pipeline yourself to start building and hopefully deploying your site. Do this by going to ‘CI/CD -> Pipelines’ and selecting ‘Run pipeline’ for the master branch.
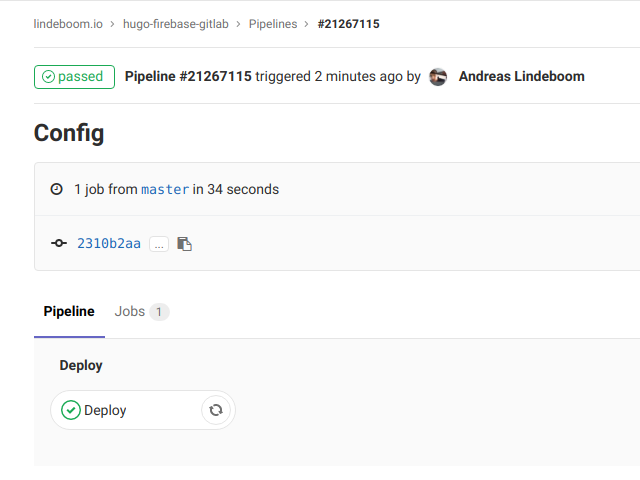
Success, your site has been deployed, and that’s it for this article. Hope to see you return for more!
Coming up: testing your website
Of course, deploying your site this way is interesting, but it doesn’t add too much value. Where services like Gitlab CI shine is in the area of automatic testing. In a later article, I will show you how to automatically validate your site’s Markdown and the generated HTML, and to check for broken links. Subscribe using RSS or follow me on Twitter to stay in the loop.
Optional: connect your own domain
Firebase allows you to connect your own domain name. It involves potentially long wait times for DNS record resolution, so I won’t go into it in this article. You can follow the instructions provided by Firebase to get it done.